How do I install BankPlus?
Series 5 / 5mx / Revo / RevoPlus / Series 7
- Download BankPlus.
- Go to the Download
page and select the appropriate file to download. Click on this file,
and your web browser should ask you to download it to a particular folder.
- Unzip BankPlus.
- Find the file that you have just downloaded. If you don’t know which folder your PC has downloaded it into, do a ‘Find File’ and search for “bankp”.
- The file is in ZIP format,which means that it is compressed. This is the standard way of distributing software over the Internet. To get to the program, you need to “unzip” it. If you’re a PC user, the best program to
use is probably WinZip. Click here to go to the WinZip Website.
- Once unzipped, you should have a file called bankplus.sis – this is the installation file.
- Install BankPlus
- Connect your EPOC machine to your PC with the PsiWin lead On your PC, double-click on the bankplus.sis file. This will start the EPOC Install program, which will copy the required files to your Psion.
- Click on your Psion’s Extras button, you should see a new icon, “BankPlus”. Tap on this to start the program.
If you do not have access to a PC with PsiWin, you may need to install a program called instexe.exe (supplied by Psion) onto your Series 5/5mx/Revo.
Copy this file onto your Psion machine, and then select and run this file to install support for SIS files (the format used for software distribution) on your machine. You can then copy the bankplus.sis file onto your Psion and install BankPlus by double-tapping. The instexe file can be downloaded by clicking here, from Psion, or on the Palmtop Magazine CD.
Series 3 / 3a / 3c / 3mx / Siena
- Download BankPlus.
- Go to the Download page and select the appropriate file to download. Click on this file, and your web browser should ask you to download it to a particular folder.
- Unzip BankPlus.
- Find the file that you have just downloaded. If you don’t know which folder your PC has downloaded it into, do a “Find File” and search for “bank”.
- The file is in ZIP format,which means that it is compressed. This is the standard way of distributing software over the Internet. To get to the program, you need to “unzip” it. If you’re a PC user, the best program to
use is probably WinZip. Click here to go to the WinZip Website.
- Once unzipped, you should have three or four files – these are the files which you now need to copy onto your Psion.
- Install BankPlus
- Connect your Psion to your PC with the PsiWin / 3link lead
- Create a directory called \APP\ on your Psion machine, either on the A:, B:, or M: (Internal) drive. (Use the “Make Directory” command from the ‘SYSTEM’ menu.)
- Copy the files that you have just unzipped into the \APP\ directory on your Psion. If upgrading from an older version of BankPlus, overwrite the old files with the new files when prompted.
- From your Psion’s ‘System’ screen, select ‘Install’ from the ‘Apps’ menu, and move to the Bank OPA file (called either Bankplus.opa or Banks.opa), using the cursor keys.
- Highlight “BankPlus” and press [Enter] to start the program.
|
Updating & deleting items
- Find the item you are looking for (Psion-F). Press Psion-U for update or Psion-D for delete. You can also select these options by pressing [Menu].
- From View (Psion-V), select the item that you are looking for. Press Psion-U for update or Psion-D for delete. You can also select these options by pressing [Menu].
|
BankPlus and the Euro
- It is possible to use BankPlus if your currency changes to Euro. The best way appears to be to apply a debit amount in your original currency to bring the
balance to zero, then change the currency of the account to Euro and
apply a credit of the new balance in Euro.
|
Importing data into BankPlus
- BankPlus for the 3c,3mx,5,5m and Revo support importing of transaction items. If you wish to import a list of transactions, they must be in a plain text file, with fields delimited by tabs. The file format is as follows:
dd/mm/yyyy<tab>itemdescription<tab>category<tab>amount
- This feature can be accessed from the Tools | Import | Account data option.
- Import from Quicken is not supported at this time, although BankPlus can export to Quicken
|
Registering BankPlus
|
Transfers by standing order
- It is not possible to set up an inter-account transfer as a Standing order. The workaround is to create two standing orders, one to debit one account, and the
other to credit the receiving account.
|
Installing an updated version of BankPlus
- The latest versions of BankPlus are available from the download page. Provided you haven’t changed machines (in which case, see below), then installing a newer version of BankPlus is straightforward.
Download the latest version and install it over the top of the existing
version. You’ll need to make sure that BankPlus isn’t running at the
time.
Series 5 and Revo users just need to run the SIS file, and Series 3a/3c
users can just unzip the files straight over the top of the existing
files. You won’t need your registration number for the upgrade, upgrades
(for the same type of machine) are free, and your existing data will
be preserved.
As with any software installation, you should always play it safe and
back up your data.For a list of what’s changed with each release of BankPlus, see the History page.
|
Upgrading BankPlus from Series 3a/3c/Siena to Series 5/Revo
- Note that datafiles are NOT compatible. A separate utility, BP3EXP.OPO
will need to be run on your Series 3/3a/3c machine to create export
files which can be read by the Series 5/Revo versions. This can be obtained
from here.
- Settings files cannot be transferred, so you will need to re-input account & category names.
- Ensure that BankPlus on the Series 3 family/Siena is not running.
- Install BP3EXP.OPO into the \OPO\ directory on your 3/3a/3c/Siena. (If there is no directory called \OPO\, create one from the System menu)
- From under the OPO icon, select BP3EXP and run the program.
- Select whether to export an Account, Standing order file, or an Archive file, and press Enter.
- Select which account you wish to convert from the list, and press Enter
- Select a name for the file you are about to export. It must have a ‘.bp3’
extension.
- Repeat this procedure for each account.
- Copy the files (.BP3) onto your Series 5, in a directory called C:\Bankplus
- Run BankPlus. You will need to manually create each account if they do not already exist.
- Open the first account that you wish to import data to.
- Run “Import” from the menu and select the BP3 file which corresponds to the account.
- Repeat the above for each account you wish to import.
- Repeat the same procedure for standing order export, but select the file BANKSO.ODB. Exporting BankPlus archive files (.bpa) is also supported in v2 of the BP3EXP.OPO application.
- Note: Your existing registration code will remove the main “nag” screens and
prompts which would appear after 30 days of unregistered use, but will
show a very infrequent reminder after nearly two months of use. If you
wish to support the ongoing development of BankPlus, you may wish to
obtain a new code to remove all nag messages. Normal registration price
is £8 (unchanged since 1996), but existing users can upgrade for just
£5. If you wish to upgrade your registration, you can do so online at
www.reg.net quoting ID 4155 (Series 5/5mx) or ID 6764 (Revo). You must supply your existing Series 3/3c/Siena code prior to registration. Note that Reg.Net add a small handling charge.
Click here for registration details.
|
Backing up, or moving BankPlus
- On an EPOC machine (such as a Series 5 or Revo), BankPlus stores it’s files in a directory called c:\bankplus, although it is possible to change this location
from the ‘Settings’ option. To back up, or move your accounts, copy the entire contents of this folder. In addition, there is a settings file which you also need to copy or backup. This file is called bankset, and is located in the c:\System\Apps\Bankplus folder. In the event that you can’t see the System folder, go to your Psion’s main system screen and from the menu, select Tools | Preferences \ Show ‘System’ folder.
- On a SIBO machine (such as a Series 3a, 3c or 3mx), you need to back up all of the files in the \BNK\ directory. You also need to back up the settings file,
which is m:\OPD\BANK.SET
|
|
Now that the Psion machines are no longer in production, we’re frequently asked whether BankPlus will be made available for other types of machines. Unfortunatly, the answer to this is currently a “no” – partly due to the time needed to create versions in other programming languages, and partly due to the fact that there are already a range of financial products for these platforms. Here are a few specific bits of information that may be of use.
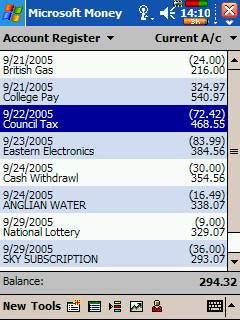
 Microsoft Money? If you are using a Pocket PC device, you might want to consider using the Pocket PC version of Microsoft Money, as this is a free download companion to Microsoft’s desktop Money program. You use your PC to manage your accounts, and when you synchronise your Pocket PC to your PC, your financial information is exchanged authomatically. Existing BankPlus users wishing to move to Microsoft Money on the PC will find that existing data can be transferred using Money’s Quicken Import option. Microsoft Money? If you are using a Pocket PC device, you might want to consider using the Pocket PC version of Microsoft Money, as this is a free download companion to Microsoft’s desktop Money program. You use your PC to manage your accounts, and when you synchronise your Pocket PC to your PC, your financial information is exchanged authomatically. Existing BankPlus users wishing to move to Microsoft Money on the PC will find that existing data can be transferred using Money’s Quicken Import option.
Microsoft Money can be purchased cheaply online from Amazon, and the Pocket PC version is available as a free download from www.microsoft.com/windowsmobile/- Oregon Osaris / Nokia Communicators: BankPlus has
not been optimised for use on these machines, and there are currently no plans to develop versions for these devices.
|
Restarting after a Backup / Accounts with a BankPlus icon
- Version 1.8 of BankPlus for EPOC introduced the ability for BankPlus to start up after a Backup operation. For this to be accomplished, it became necessary
to make BankPlus account files recognisable by the operating system.
Accordingly, new files created with version 1.8 or above will have a BankPlus icon, but older files won’t. This change makes it easier to identify BankPlus files, and allows a restart after a backup operation.
Users may wish to convert their older BankPlus files so that they can also have an icon and be restarted after a backup. This is possible, but it is important to backup your data before doing so. To do this, from the main screen, press Ctrl-A, to get to the ‘About’ Screen, then press the letter “i”. You will be prompted to re-create data files. If you choose to proceed, the files will be recreated with BankPlus icons
|
Tidying and Archiving
- Tidy – This feature allows you to delete old items. This will typically be done
if you find BankPlus beginning to slow down due to the amount of data you have in an account. You can select one or all accounts to “tidy”, and specify a date range, before which all entries will be deleted. You should normally only “tidy” items that have been marked as “cleared”, otherwise your cleared balance may be affected.
- Archive – This feature lets you copy items into a new or existing archive file. You would typically use an archive file to copy data from one or more accounts,
prior to “tidying” accounts. The action of “archiving” then “tidying” an account will means that BankPlus will have less data to sort through, so will speed up, but if you want to look back over old transactions, they’re still available via the archive file. Archive files can be searched, and added to, but they hold no balance information. An “archive” does not delete data.
|
| There is a mismatch between Balance and Cleared amounts
On occasions, BankPlus users report that even though all entries are set as “cleared”, the balance and cleared amounts do not match. Rather that being a problem with BankPlus’s ability to do the maths, this is almost certainly due
to an item appearing outside the expected date range. Here are the things
to look for:
- You have cleared an item in the future (you should not clear an item until it has appeared on your bank statement) Check this by using Find to look for any entries beyond today that are not set to “uncleared”. If you find an item that has been cleared by accident, editing this item to become “uncleared” will resolve the problem.
- There is an item outside the date range that you are expecting (maybe you typed in the wrong year). Try doing a “find” for the item, setting the date to 1/1/1900, and the ‘items’ field to “all” – that should find the rogue entry.
- There is a duplicate entry, probably in the items you cleared most recently. Try looking at a list in “View” to find the duplicate.
- Work out how much you are “out” by, then use “Find” to search for the amount.
If you still have a problem, please email the appropriate BANK0x.ODB file, so that I can search for the rogue entry. This obviously means sending me data that may be confidential, whcih you may not wish to do. If this is the case, the workaround is to enter a “dummy” item for the amount needed to correct it, and then clear and delete the entry. |
Deleting a category
- To delete a category, empty the “Category name” and “Abbreviation” fields.
|
Exporting data from BankPlus
- BankPlus comes with a converter to allow export of your BankPlus account data to text files in a format that can be recognised by many PC applications. If the format doesn’t suit your needs, you may need to use a text editor (such as Windows notepad), to change the format or delimiters.
- On a Series 3a/3c, if you find that your menu doesn’t have an “Export” option ,then it’s likely that you’re missing the BANKPLUS.PRG converter plugin. Download the latest version of BankPlus and copy the BANKPLUS.PRG into the \APP\ directory with the rest of the application files, then restart BankPlus.
|
Problems with Quicken Export
- Differences between versions of Intuit’s Quicken package have meant that file import is not longer as easy as it once was. Quicken changed the structure of
their QIF format to deal with Year 2000 issues. Accordingly, BankPlus has also
been updated in accordance with their changes, although their format
handling is not consistent, for example:– Quicken 98 expects: 20/02/03 for 20 Feb 2003, and 20/02’03 for 1903
(an apostrophe denotes 1901 – 1949)
– Quicken 2000 onwards expects: 20/02’03 for 20 Feb 2003
Current versions of BankPlus support the Quicken 2000 method, however if you are having problems, you can open up the QIF file with your PC text editor, and use the “replace” feature to change ’03 to /03 if needed.
For more details of the QIF file format, go to Intuit QIF page. Also, see a discussion thread on this here.
|
Printing via PsiWin
- Psion has not released a way of accessing the “Psion Print” command from
OPL (their programming language) at this time, which means that it is not possible to print from BankPlus direct to a printer via PsiWin. The official workaround is to use the RPRINT.EXE file supplied on Disk One of the PsiWin set of disks. This is a DOS executable program. The other option is to print to a text file, open the text file in Word, and use Word’s ‘Print via Psiwin’ option.
|
Problems printing
- “Device does not exist” – This error appears if your Serial link is switched
on. Exit BankPlus and go to the system screen (via the system button). Press Psion-L. At the Communications screen, set “use” to “None” and not “Link Cable”.
- You should also check the settings under “Printer” (Psion-Y) to make sure
Parallel is selected.
- If printing via a PC, see the FAQ about PsiWin printing.
- As an alternative, select “Print to File” from BankPlus and open with Word to
change the format of your printout
|
I’ve changed my standing order amount, but entries haven’t changed.
- This is by design. Once a month, the program opens the standing order file
and sees what payments are due. It will open the appropriate bank account
database (e.g. current account) and check to see that the current month’s
has been paid, and it will also check future months (to help your forward
planning). The number of months forward that it checks, is set in the
Preferences screen. When BankPlus applies a standing order, it creates
a new entry in the account database. At that point, the standing order
is deemed to have been processed. If you when go into ‘Standing orders’
and change the amount, it’s too late, as it’s already an entry in the
account. You need to edit the entry to reflect any change. Entries that
haven’t yet been processed will appear with the new amount at the point
of processing.
|
I can’t set an event for over a year in the future
- This is by design, to prevent you from accidentally entering an event too
far in advance (and therefore messing up your balance). We feel it’s
unlikely that users will wish to enter items over one year in advance,
but if you really need to enter an item that far in advance, or wish
to test that BankPlus can cope with future events, you can set the Psion
clock forward, however note that this may result in early creation of
future standing order entries and is not advised.
|
Converting Archive files
- The Archive facility in BankPlus allows for you to search through an archive for a particular transaction. If you wish to do more with your archive file, you can convert an archive file (.bpa) to a file that can be used by another application, such as a spreadsheet. Use the small stand-alone application BarcConv, which is available from the Download page to convert your bpa file to a comma or tab delimited file that can be imported into programs such as Psion Sheet or a desktop application such as Excel. BarcConv runs on the Revo, Series 5 and Series 7 families.
|
Offset to zero?
- This option appears when running a BankPlus graph. When viewing a graph,
the scale typically represents the highest and lowest account balance
for the specified time period. If you wish to make sure that 0 appears
on the scale (for example where the graph range is only 5000 to 6000),
check the “offset to zero” option.
|
Disabling the password
- Select “Password” from the menu
- When prompted, enter your password
- Change “Setting” to “Off” & press Enter
|
Year 2000
- BankPlus for the 3a/3c/3mx, Siena, Series 5/mx and Revo family are all Year 2000 compliant.
|
Troubleshooting
If you’re experiencing an unusual problem with BankPlus, under some circumstances it may be helpful to send a copy of your configuration. This allows the author to help check your system setup. To do this, follow this procedure:
- Start BankPlus
- From the Tools menu, select ‘Report’
- Select “Setup information” as the report type and press Enter
- Select all of the report options and press Enter
- Select the default file name and press Enter
- Email the file bankplus.exp, which should be in your Documents folder (Series
5) or WRD folder (Series 3/Siena), to the author.
It is also helpful to email your settings file, called bankset , which can be found
in the c:\System\Apps\BankPlus\ folder.
Series 3a/3c users: The settings file is called bank.set in the \OPD\ folder, and the report is under ‘Utils | Export’ |